Showing posts with label kitchen. Show all posts

Monday, July 22, 2013

Frozen Chocolate-Covered Strawberries

 Since I can no longer eat my usual desserts of choice: 
either my body weight in Sour Patch Kids (corn)
or my body weight in homemade cookies (butter & eggs),
I've had to do some research on delicious but simple dessert recipes
to get me through this dietary transition.
{The ingredients listed in parenthesis are the ones to which Greta is allergic.}

I actually stumbled upon the idea of strawberry chocolate cups on Instagram.
They looked so delicious that I quickly turned to Pinterest to do some more thorough research.
After discovering several recipes, I decided to wing it --
if you can consider this winging it.
It's really just a chocolate covered strawberry in a muffin tin,
but you know, I would have never thought of that
and to give myself some credit there were several ways to approach it.


^^^ Trader Joe's Coconut Oil ^^^
Fresh strawberries, cut into bite sized pieces
Enjoy Life chocolate chips, 
you can us regular chocolate chips if you have no allergy restrictions {obvi}
Mini muffin tin


^^^ I didn't use any specific measurements ^^^
but I just poured some chocolate chips in a microwaveable bowl,
added a scoop of coconut oil,
 microwaved the combo for a minute,
and then stirred until it was smooth.


^^^ I added a dollop of chocolate ^^^
to the bottom of the mini muffin tin
and then dropped in several strawberry bites.
Then I drizzled more chocolate on top until the strawberries were mostly covered.


^^^ I froze them for several hours. ^^^


^^^ Voila ^^^
Frozen Chocolate-Covered Strawberries!


Wednesday, May 29, 2013

Chocolate Graduation Caps


My cousin, Ethan, graduates from high school on Friday.
He is the baby of the family,
or I suppose he was the baby now that we have actual babies around,
and him graduating makes me feel impossibly old.

After his graduation ceremony Friday afternoon,
we are going to celebrate as a family with a little par-tay!
In honor of Ethan, I decided to contribute 
chocolate graduation caps using his school colors.

As you know, I prefer to spend as little time in the kitchen as possible.
However, these little guys were super fun to make!
{Think more arts-and-crafts than cooking.}
And BONUS! they are super cute decor...
DOUBLE BONUS!! they are super delicious to eat...
AND TRIPLE BONUS!!! they are super easy to create!

I mean how can you go wrong with a triple bonus treat?!

Here's the low-down:


Supplies Needed:
-M&M's (I picked out E's school colors)
-Mini Reese's Peanut Butter Cups
-Ghirardelli Chocolate Squares
-Fruit by the Foot (I chose blue to match)


Step 1: Unwrap the chocolate

Step 2: Unroll the Fruit by the Foot

Step 3: Cut the Fruit by the Foot into strips to make the tassels

Step 4: Assemble using the Fruit by the Foot 
as you would a glue dot to stick everything together.

*TIP* Put the top together first, then place that on top of the peanut butter cup.
{I accidentally smashed too many cups by placing the M&M on the chocolate square too hard.}


And voila!
There you have it...
a TRIPLE BONUS graduation treat!


Thursday, May 31, 2012

You Scream, I Scream...

After going to two cookouts this summer where homemade ice cream was served,
I was convinced to try to make it for myself.
We were given an ice cream maker for a wedding present {nearly two years ago}
but had never had the courage to even open the box.
In fact, after the move we realized we haven't opened the majority of our wedding gifts.
It has been like Christmas opening them all!

After two attempts, 
I found that homemade ice cream was not so hard to make.

We made mint chocolate chip.


Ingredients included:
Whole Milk
Half & Half
Whipping Cream
Sugar
Salt
Peppermint Extract
Green Food Coloring
Chocolate Chip
Andes Mint Chips


After mixing the ingredients according to the recipe's instructions,
we poured the mixture into the ice cream maker.


We left it to churn for 25 minutes
but after 20 minutes our little ice cream maker
stopped churning. 

Apparently, the motor became overheated.

Disappointed but not discouraged,
we let the motor rest and put the canister with the ice cream ingredients in the freezer.
We waited about 20 minutes before giving it another go.
We let the maker churn for about 30 minutes.
Despite our excitement that the motor did not overheat again,
we had to come to the realization that this batch was not going to thicken.
We referred to it as "ice cream soup" and decided to walk away.


I wasn't quite ready to give up,
so I put the "soup" in a bowl and stored it in the refrigerator,
then cleaned the canister and put it in the freezer.
{We read that some recipes need to pre-cool before churning.}

The next morning I woke up eager to try again.
I put the much colder ice cream mixture
in the very cold ice cream maker
and within 25 minutes
I had made beautiful, thick mint chocolate chip ice cream!!


Now I can't wait to try other recipes!

Do you have any suggestions or recommendations?


Wednesday, December 21, 2011

Cookie-Exchange/Stella & Dot Party

Last night I hosted my first ever cookie exchange.
I really had no idea how to host such an event,
so of course I did what all do when in doubt; 
I Googled it.
There are several ways to do a cookie exchange I found out
but I decided to have each guest bring only one batch of cookies.
We displayed them all evening and 
people were welcome to taste any and all that they wanted.
At the end of the evening, 
each guest was given a cookie tin {from the Dollar Tree!!} and
they selected a variety to take home with them.

This party was not only a cookie exchange but also a Stella & Dot party.
Oh, how I love their jewelry!


Sunday, December 18, 2011

Kitchen Experiment = Epic Fail

As you know by now,
I am not at home in the kitchen.

It is more than just not liking to cook,
don't get me wrong...
I do not like to cook.
But it is more than that.
I am just plain bad at all things related to the kitchen.
Therefore,
I do not cook.

I have been quite honest with husband
about this skill-deficiency.
Lucky for me, 
he is not only okay with it, 
but enjoys taking over this domestic duty --
 at least that is what he tells me --
and he is pretty darn good at it.

So I really should not be surprised that
as I tried to temporarily deny my domestic ineptness,
my kitchen experiment went awry.

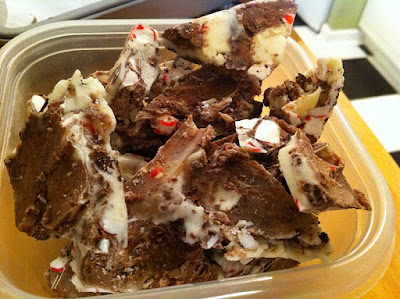
I attempted to make peppermint bark
and ended up with chocolate chunks
sprinkled with crushed peppermint.

I must have been swept away by the holiday cheer
because this one was definitely a doozy.


I used this recipe -- simple enough...
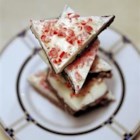
Layered Peppermint Bark Recipe
This is what is was supposed to look like.

melt chocolate.
crush peppermint.
pour melted chocolate in a pan.
sprinkle with crushed peppermint.
chill for 15-20 minutes.
repeat to layer.

This is what I got...


A horrible mess.


Of course, husband comes in to save the day.
He has the clever idea to melt down my attempt at peppermint bark
and make what he calls "dirty" peppermint bark.


It worked.


Now we have a reasonably thick bark to gift {and eat}.

And I will tell you what...
I am going to go ahead and retire my oven mitts
and leave it to the expert in the family.

Hope your holiday baking is off to a better start than mine.


Thursday, August 11, 2011

Recipes

As I am sure you have figured out by now,
I am not what they call, "Good in the kitchen."

I mean, if I am going to get my hands dirty 
it is probably going to involve paint, glitter, glue, clay, etc.
Well, maybe not all of those and definitely not all together.
Actually, I guess it could but probably wouldn't. 
Hmm. I might have to try that combo of materials one day.

Anyway... 
{I am getting side tracked here.}

I found the perfect solution.

Illustrated recipes!

The drawings keep me captivated long enough to actually read the entire recipe.
I have found that helps a lot, actually reading the recipe.

So, here are some of my favorite illustrations.
I have yet to try them out in the kitchen.
I will let you know when I do.
But for your safety, 
I wouldn't hold your breath.


Stuffed Portobellos


Linguini with Grilled Tomatoes and Feta Cheese


Mom-mom's Perfect Peach Cake


Sweet Potato Enchiladas

All recipes can be found {here}.